Add or Edit a Third Party Payment Batch
The Third Party Payment Batch Entry page allows authorized users to create payment batches from sources generated outside the standard flow of the New World ERP application.
To create or edit batches of third party payments, follow the steps below:
- Go to Financial Management > Payment Processing > Third Party Payment Batches. The Third Party Payment Batch List page opens.
The grid on this page shows unposted third party payment batches, with each row corresponding to a batch. The standard workflow icons used for batch processing are displayed above the grid.
- Click New to create a new batch. To edit an existing batch click the Bank Account hyperlink. The Third Party Payment Batch Entry page opens. The Batch Type (Manual or Import) displays the type of third party payment batch.
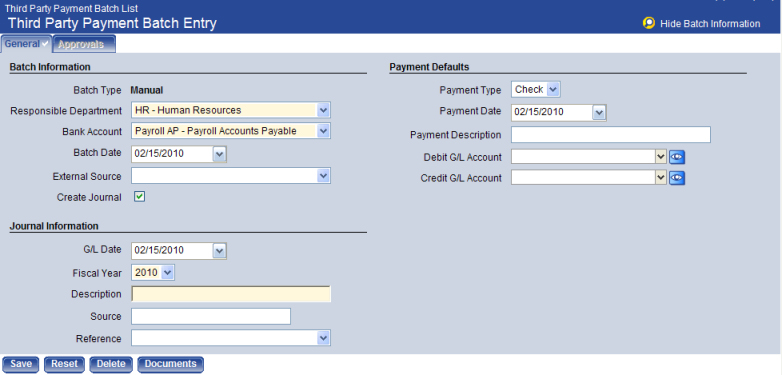
- In Responsible Department, select the department responsible for this third party payment batch.
- In Bank Account, select the bank account to use associated to the third party payment batch.
- In Batch Date, select the processing date of the third party payment batch.
- In External Source, if known, select the source of the third party payment batch. These values are defined by your organization in Validation Set 362, Imported Payment Batch External Source.
- Select the Create Journal check box if you want the payment batch to create a journal when the batch is posted. If selected, the Journal Information section displays.
Click here to see the selection criteria to define for the journal:
- In G/L Date, type or select the general ledger date of the journal to be applied to payment transactions as they are entered.
- In Fiscal Year, select the fiscal year of the journal generated by the payment batch.
- In Description, type the description of the batch; also, the default description of the journal entries created by the payment batch process.
- In Source, type the default source of the journal entries created by the payment batch process.
- In Reference, select the journal reference given to the batch. These values are defined by your organization in Validation Set 356, Journal Reference.
Payment Defaults
To alleviate the task of entering payment information for each payment in the batch, you can enter default payment information that applies to all payments. The defaults can be overridden for individual transactions. Use the following fields for payment default information:
- In Payment Type, select the default payment type for any payments entered in the batch.
- In Payment Date, select the default payment date for any payments entered in the batch.
- In Payment Description, type the default payment description for any payment entered in the batch.
- In Debit G/L Account, select the default general ledger account to debit for payments entered in the batch. Depending on the G/L account entered, you may be prompted to specify project information for the transactions.
- In Credit G/L Account, select the default general ledger account to credit for payments entered in the batch. Depending on the G/L account entered, you may be prompted to specify project information for the transactions.
- Click Save to save the batch and the page refreshes to display additional buttons and a grid where you can enter the payments associated with the batch.
For more information on entering a payment entry, see Add or Edit a Third Party Payment Batch Payment.
To reset all entries to what they were before the page was opened and BEFORE you save the page, click Reset.
To delete a payment batch, click Delete. The Delete button is hidden or disabled if you do not have the appropriate security permissions.
Click Documents to add or track documents associated with a payment reconciliation batch record on your system. Documents may include Microsoft Word® text files, digitized photographs, or even video clips. The Documents page uses the Document Viewer feature.